|
Wie zu zitieren 1. Für Zitate im Text (Materialien & Methoden): 2. Für die Tabelle der Schlüsselressourcen: |
||
|
Gebührenfrei: (877) 796-6397 -- Nur USA und Kanada -- |
Fax: +1-832-582-8590 Bestellungen: +1-832-582-8158 |
Technischer Support: +1-832-582-8158 Ext:3 Bitte geben Sie Ihre Bestellnummer in der E-Mail an. Wir bemühen uns, alle E-Mail-Anfragen innerhalb eines Werktages zu beantworten. |
Biologische Beschreibung
| Spezifität | Acetyl-α-Tubulin (Lys40) Antibody [F22D16] detektiert endogene Spiegel des gesamten α-Tubulin-Proteins nur, wenn es an Lys40 acetyliert ist. |
|---|---|
| Hintergrund | Acetyl-α-Tubulin (Lys40) stellt die an Lysin 40 acetylierte Form von α-Tubulin dar, einer Kernuntereinheit der Tubulin-Heterodimerfamilie, die zu Mikrotubuli polymerisiert, wesentliche zytoskelettale Elemente in eukaryotischen Zellen. Die Acetylierung zielt auf die ε-Aminogruppe des hochkonservierten Lys40-Rests innerhalb einer flexiblen luminalen Schleife von 20 Aminosäuren (Reste 37-56) ab, die in das Mikrotubulus-Innere ragt, wo sie sich zu einer unregelmäßigen Windung faltet, die sich an den Trichter des aktiven Zentrums der Acetyltransferase TAT anlagert, der durch konservierte Reste wie Gln58, Arg158, Ile64 und Asp157 für die Substraterkennung und Deprotonierung gebildet wird. Diese interne Modifikation, einzigartig unter den Mikrotubulus-PTMs, erfolgt post-Polymerisation durch TAT, das über Gitteröffnungen auf das Lumen zugreift. Die Lys40-Acetylierung verbessert die Flexibilität und Widerstandsfähigkeit der Mikrotubuli gegenüber mechanischem Stress, indem sie die Rotationswinkel der Protofilamente und die Gitterstabilität verändert, wodurch langlebige Mikrotubuli gefördert werden, die für die dendritische Arborisierung, das Axonwachstum, den intrazellulären Transport, die Zellmotilität und die neuronale Verzweigung entscheidend sind. Sie wird dynamisch durch HDAC6-Deacetylierung umgekehrt und in mechanosensitive Signalwege integriert, wo stabile acetylierte MTs den Zilien-/Flagellenschlag und die Etablierung der Polarität unterstützen. Eine Dysregulation ist mit Neurodegeneration verbunden, da eine reduzierte Acetylierung die dendritische Stabilität und Lokomotion in Modellen wie Drosophila atat-Mutanten beeinträchtigt. |
Nutzungsinformationen
| Anwendung | WB, IHC | Verdünnung |
|
||
|---|---|---|---|---|---|
| Reaktivität | bovine, frog, invertebrates, human, hamster, mouse, protista, pig, monkey, chicken, rat, plant | ||||
| Quelle | Mouse Monoclonal Antibody | MW | |||
| Lagerpuffer | PBS, pH 7.2+50% Glycerol+0.05% BSA+0.01% NaN3 | Lagerung (Ab dem Datum des Erhalts) |
-20°C (avoid freeze-thaw cycles), 2 years | ||
| WB |
Experimental Protocol:
Sample preparation
1. Tissue: Lyse the tissue sample by adding an appropriate volume of ice-cold RIPA/NP-40 Lysis Buffer (containing Protease Inhibitor Cocktail),and homogenize the tissue at a low temperature. 2. Adherent cell: Aspirate the culture medium and wash the cells with ice-cold PBS twice. Lyse the cells by adding an appropriate volume of RIPA/NP-40 Lysis Buffer (containing Protease Inhibitor Cocktail) and put the sample on ice for 5 min. 3. Suspension cell: Transfer the culture medium to a pre-cooled centrifuge tube. Centrifuge and aspirate the supernatant. Wash the cells with ice-cold PBS twice. Lyse the cells by adding an appropriate volume of RIPA/NP-40 Lysis Buffer (containing Protease Inhibitor Cocktail) and put the sample on ice for 5 min. 4. Place the lysate into a pre-cooled microcentrifuge tube. Centrifuge at 4°C for 15 min. Collect the supernatant;
5. Remove a small volume of lysate to determine the protein concentration;
6. Combine the lysate with protein loading buffer. Boil 20 µL sample under 95-100°C for 5 min. Centrifuge for 5 min after cool down on ice.
Electrophoretic separation
1. According to the concentration of extracted protein, load appropriate amount of protein sample and marker onto SDS-PAGE gels for electrophoresis. Recommended separating gel (lower gel) concentration: 10%. Reference Table for Selecting SDS-PAGE Separation Gel Concentrations 2. Power up 80V for 30 minutes. Then the power supply is adjusted (110 V~150 V), the Marker is observed, and the electrophoresis can be stopped when the indicator band of the predyed protein Marker where the protein is located is properly separated. (Note that the current should not be too large when electrophoresis, too large current (more than 150 mA) will cause the temperature to rise, affecting the result of running glue. If high currents cannot be avoided, an ice bath can be used to cool the bath.)
Transfer membrane
1. Take out the converter, soak the clip and consumables in the pre-cooled converter;
2. Activate PVDF membrane with methanol for 1 min and rinse with transfer buffer;
3. Install it in the order of "black edge of clip - sponge - filter paper - filter paper - glue -PVDF membrane - filter paper - filter paper - sponge - white edge of clip"; 4. The protein was electrotransferred to PVDF membrane. ( 0.45 µm PVDF membrane is recommended ) Reference Table for Selecting PVDF Membrane Pore Size Specifications Recommended conditions for wet transfer: 200 mA, 120 min. ( Note that the transfer conditions can be adjusted according to the protein size. For high-molecular-weight proteins, a higher current and longer transfer time are recommended. However, ensure that the transfer tank remains at a low temperature to prevent gel melting.)
Block
1. After electrotransfer, wash the film with TBST at room temperature for 5 minutes;
2. Incubate the film in the blocking solution for 1 hour at room temperature;
3. Wash the film with TBST for 3 times, 5 minutes each time.
Antibody incubation
1. Use 5% skim milk powder to prepare the primary antibody working liquid (recommended dilution ratio for primary antibody 1:16666), gently shake and incubate with the film at 4°C overnight; 2. Wash the film with TBST 3 times, 5 minutes each time;
3. Add the secondary antibody to the blocking solution and incubate with the film gently at room temperature for 1 hour;
4. After incubation, wash the film with TBST 3 times for 5 minutes each time.
Antibody staining
1. Add the prepared ECL luminescent substrate (or select other color developing substrate according to the second antibody) and mix evenly;
2. Incubate with the film for 1 minute, remove excess substrate (keep the film moist), wrap with plastic film, and expose in the imaging system.
|
| IHC |
Experimental Protocol:
Deparaffinization/Rehydration
1. Deparaffinize/hydrate sections:
2. Incubate sections in three washes of xylene for 5 min each.
3. Incubate sections in two washes of 100% ethanol for 10 min each.
4. Incubate sections in two washes of 95% ethanol for 10 min each.
5. Wash sections two times in dH2O for 5 min each.
6.Antigen retrieval: For Citrate: Heat slides in a microwave submersed in 1X citrate unmasking solution until boiling is initiated; continue with 10 min at a sub-boiling temperature (95°-98°C). Cool slides on bench top for 30 min.
Staining
1. Wash sections in dH2O three times for 5 min each.
2. Incubate sections in 3% hydrogen peroxide for 10 min.
3. Wash sections in dH2O two times for 5 min each.
4. Wash sections in wash buffer for 5 min.
5. Block each section with 100–400 µl of blocking solution for 1 hr at room temperature.
6. Remove blocking solution and add 100–400 µl primary antibody diluent in to each section. Incubate overnight at 4°C.
7. Remove antibody solution and wash sections with wash buffer three times for 5 min each.
8. Cover section with 1–3 drops HRPas needed. Incubate in a humidified chamber for 30 min at room temperature.
9. Wash sections three times with wash buffer for 5 min each.
10. Add DAB Chromogen Concentrate to DAB Diluent and mix well before use.
11. Apply 100–400 µl DAB to each section and monitor closely. 1–10 min generally provides an acceptable staining intensity.
12. Immerse slides in dH2O.
13. If desired, counterstain sections with hematoxylin.
14. Wash sections in dH2O two times for 5 min each.
15. Dehydrate sections: Incubate sections in 95% ethanol two times for 10 sec each; Repeat in 100% ethanol, incubating sections two times for 10 sec each; Repeat in xylene, incubating sections two times for 10 sec each.
16. Mount sections with coverslips and mounting medium.
|
Referenzen
|
Anwendungsdaten
WB
Validiert von Selleck
-
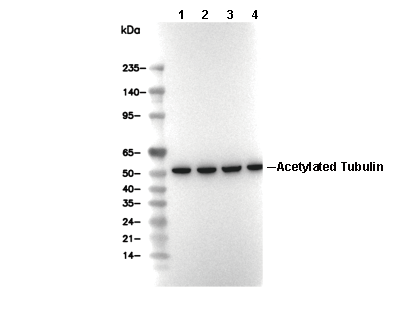 Lane 1: HeLa, Lane 2: U87, Lane 3: COS7, Lane 4: CHO