|
Wie zu zitieren 1. Für Zitate im Text (Materialien & Methoden): 2. Für die Tabelle der Schlüsselressourcen: |
||
|
Gebührenfrei: (877) 796-6397 -- Nur USA und Kanada -- |
Fax: +1-832-582-8590 Bestellungen: +1-832-582-8158 |
Technischer Support: +1-832-582-8158 Ext:3 Bitte geben Sie Ihre Bestellnummer in der E-Mail an. Wir bemühen uns, alle E-Mail-Anfragen innerhalb eines Werktages zu beantworten. |
Biologische Beschreibung
| Spezifität | Atg14 Antibody [B19L16] erkennt endogene Spiegel des gesamten Atg14-Proteins. |
|---|---|
| Hintergrund | ATG14 ist ein kritisches Autophagy-spezifisches Protein, das eine zentrale Rolle bei der Initiierung der Autophagosomenbildung und der Regulierung selektiver Autophagy-Prozesse wie der Lipophagie spielt. ATG14 ist eine Kernkomponente des Klasse-III-Phosphatidylinositol-3-Kinase-Komplexes I (PI3KC3-C1), wo es mit Beclin1, VPS34 und VPS15 interagiert, um die Produktion von Phosphatidylinositol-3-Phosphat (PI3P) am Phagophor zu steuern, einem wichtigen Schritt für die Autophagy-Initiierung. Die N-terminale Region von ATG14 enthält Coiled-Coil-Domänen und konservierte Cysteinreste, die für die Komplexbildung und die Lokalisation zur prä-autophagosomalen Struktur (PAS) oder zum endoplasmatischen Retikulum entscheidend sind. Seine C-terminale BATS-Domäne erkennt Membrankrümmung und bindet Lipide, was die Membranzielsteuerung ermöglicht. ATG14 besitzt auch ein LC3-interagierendes-Region (LIR)-Motiv, das die direkte Bindung an Proteine der ATG8-Familie und die Frachterkennung während der selektiven Autophagy erleichtert. ATG14 leitet den PI3KC3-C1-Komplex zu autophagischen Membranen, fördert die Autophagosomenbildung und fungiert als Rezeptor bei der Lipophagie, indem es Lipidtröpfchen zur Degradation markiert; sowohl seine BATS-Domäne als auch sein LIR-Motiv sind für diese Rollen unerlässlich. Es trägt auch zur zellulären und Gewebehomöostase bei, indem es vor unangemessener Pyroptose und Entzündung schützt. |
Nutzungsinformationen
| Anwendung | WB, IP | Verdünnung |
|
||||
|---|---|---|---|---|---|---|---|
| Reaktivität | Human, Mouse, Rat | ||||||
| Quelle | Rabbit Monoclonal Antibody | MW | 65 kDa | ||||
| Lagerpuffer | PBS, pH 7.2+50% Glycerol+0.05% BSA+0.01% NaN3 | Lagerung (Ab dem Datum des Erhalts) |
-20°C (avoid freeze-thaw cycles), 2 years | ||||
| WB |
Experimental Protocol:
Sample preparation
1. Tissue: Lyse the tissue sample by adding an appropriate volume of ice-cold RIPA/NP-40 Lysis Buffer (containing Protease Inhibitor Cocktail),and homogenize the tissue at a low temperature. 2. Adherent cell: Aspirate the culture medium and wash the cells with ice-cold PBS twice. Lyse the cells by adding an appropriate volume of RIPA/NP-40 Lysis Buffer (containing Protease Inhibitor Cocktail) and put the sample on ice for 5 min. 3. Suspension cell: Transfer the culture medium to a pre-cooled centrifuge tube. Centrifuge and aspirate the supernatant. Wash the cells with ice-cold PBS twice. Lyse the cells by adding an appropriate volume of RIPA/NP-40 Lysis Buffer (containing Protease Inhibitor Cocktail) and put the sample on ice for 5 min. 4. Place the lysate into a pre-cooled microcentrifuge tube. Centrifuge at 4°C for 15 min. Collect the supernatant;
5. Remove a small volume of lysate to determine the protein concentration;
6. Combine the lysate with protein loading buffer. Boil 20 µL sample under 95-100°C for 5 min. Centrifuge for 5 min after cool down on ice.
Electrophoretic separation
1. According to the concentration of extracted protein, load appropriate amount of protein sample and marker onto SDS-PAGE gels for electrophoresis. Recommended separating gel (lower gel) concentration: 10%. Reference Table for Selecting SDS-PAGE Separation Gel Concentrations 2. Power up 80V for 30 minutes. Then the power supply is adjusted (110 V~150 V), the Marker is observed, and the electrophoresis can be stopped when the indicator band of the predyed protein Marker where the protein is located is properly separated. (Note that the current should not be too large when electrophoresis, too large current (more than 150 mA) will cause the temperature to rise, affecting the result of running glue. If high currents cannot be avoided, an ice bath can be used to cool the bath.)
Transfer membrane
1. Take out the converter, soak the clip and consumables in the pre-cooled converter;
2. Activate PVDF membrane with methanol for 1 min and rinse with transfer buffer;
3. Install it in the order of "black edge of clip - sponge - filter paper - filter paper - glue -PVDF membrane - filter paper - filter paper - sponge - white edge of clip"; 4. The protein was electrotransferred to PVDF membrane. ( 0.45 µm PVDF membrane is recommended ) Reference Table for Selecting PVDF Membrane Pore Size Specifications Recommended conditions for wet transfer: 200 mA, 120 min. ( Note that the transfer conditions can be adjusted according to the protein size. For high-molecular-weight proteins, a higher current and longer transfer time are recommended. However, ensure that the transfer tank remains at a low temperature to prevent gel melting.)
Block
1. After electrotransfer, wash the film with TBST at room temperature for 5 minutes;
2. Incubate the film in the blocking solution for 1 hour at room temperature;
3. Wash the film with TBST for 3 times, 5 minutes each time.
Antibody incubation
1. Use 5% skim milk powder to prepare the primary antibody working liquid (recommended dilution ratio for primary antibody 1:1000), gently shake and incubate with the film at 4°C overnight; 2. Wash the film with TBST 3 times, 5 minutes each time;
3. Add the secondary antibody to the blocking solution and incubate with the film gently at room temperature for 1 hour;
4. After incubation, wash the film with TBST 3 times for 5 minutes each time.
Antibody staining
1. Add the prepared ECL luminescent substrate (or select other color developing substrate according to the second antibody) and mix evenly;
2. Incubate with the film for 1 minute, remove excess substrate (keep the film moist), wrap with plastic film, and expose in the imaging system.
|
Referenzen
|
Anwendungsdaten
WB
Validiert von Selleck
-
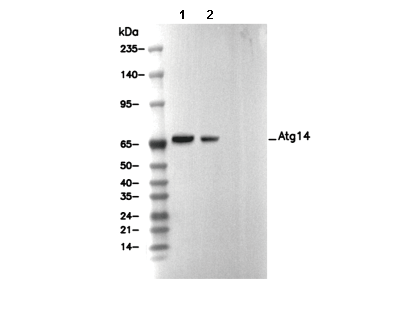 Lane 1: HCT116, Lane 2: Hepg2