|
Wie zu zitieren 1. Für Zitate im Text (Materialien & Methoden): 2. Für die Tabelle der Schlüsselressourcen: |
||
|
Gebührenfrei: (877) 796-6397 -- Nur USA und Kanada -- |
Fax: +1-832-582-8590 Bestellungen: +1-832-582-8158 |
Technischer Support: +1-832-582-8158 Ext:3 Bitte geben Sie Ihre Bestellnummer in der E-Mail an. Wir bemühen uns, alle E-Mail-Anfragen innerhalb eines Werktages zu beantworten. |
Biologische Beschreibung
| Spezifität | Cdc25C Antibody [K18P10] detektiert endogene Spiegel des gesamten Cdc25C-Proteins. |
|---|---|
| Hintergrund | Cdc25C ist eine kritische Dual-Spezifität-Phosphatase, die den Zellzyklusfortschritt durch Aktivierung des Cyclin B1/CDK1-Komplexes reguliert und den G2/M-Übergang sowie den mitotischen Eintritt steuert. Es besteht aus ungefähr 473 Aminosäuren, die in eine N-terminale regulatorische Domäne und eine hochkonservierte C-terminale katalytische Domäne mit dem HCX5R-Motiv organisiert sind, das für seine Phosphataseaktivität essentiell ist. Die N-terminale Domäne enthält mehrere Phosphorylierungsstellen und Bindungsmotive, wie z.B. nukleäre Lokalisierungs- und Exportsequenzen, die die subzelluläre Lokalisation, Stabilität und Aktivität von Cdc25C durch Interaktionen mit Proteinen wie 14-3-3 und Checkpoint-Kinasen regulieren. Die katalytische Domäne enthält einen entscheidenden Cysteinrest, der für die Substratdephosphorylierung notwendig ist. Cdc25C dephosphoryliert Thr14 und Tyr15 auf CDK1, was die Bildung des aktiven Cyclin B1/CDK1-Komplexes fördert, der für den mitotischen Eintritt essentiell ist. Seine Aktivität wird durch Phosphorylierungs-abhängige Mechanismen, an denen Kinasen wie CHK1, CHK2 und ATM beteiligt sind, streng reguliert, insbesondere als Reaktion auf DNA-Schäden, was zu seiner Hemmung und Zellzyklusarrest in G2/M führt, um genomische Instabilität zu verhindern. Cdc25C wird auch durch Interaktionen mit 14-3-3-Proteinen reguliert und kann durch Kinasen wie Wee1 und Myt1 inaktiviert werden. Cdc25C moduliert Apoptosewege, indem es die ASK1-Kinase während der Interphase negativ reguliert und so eine vorzeitige Apoptose verhindert. Dysregulation oder Überexpression von Cdc25C wurde mit Krebs in Verbindung gebracht, wo es zur unkontrollierten Zellproliferation und zur Umgehung von Zellzyklus-Checkpoints beiträgt. |
Nutzungsinformationen
| Anwendung | WB, IP, IHC, IF, FCM | Verdünnung |
|
||||||||
|---|---|---|---|---|---|---|---|---|---|---|---|
| Reaktivität | Human | ||||||||||
| Quelle | Rabbit Monoclonal Antibody | MW | 53 kDa | ||||||||
| Lagerpuffer | PBS, pH 7.2+50% Glycerol+0.05% BSA+0.01% NaN3 | Lagerung (Ab dem Datum des Erhalts) |
-20°C (avoid freeze-thaw cycles), 2 years | ||||||||
| WB |
Experimental Protocol:
Sample preparation
1. Tissue: Lyse the tissue sample by adding an appropriate volume of ice-cold RIPA/Nuclear Lysis Buffer (containing Protease Inhibitor Cocktail),and homogenize the tissue at a low temperature. 2. Adherent cell: Aspirate the culture medium and wash the cells with ice-cold PBS twice. Lyse the cells by adding an appropriate volume of RIPA/Nuclear Lysis Buffer (containing Protease Inhibitor Cocktail) and put the sample on ice for 5 min. 3. Suspension cell: Transfer the culture medium to a pre-cooled centrifuge tube. Centrifuge and aspirate the supernatant. Wash the cells with ice-cold PBS twice. Lyse the cells by adding an appropriate volume of RIPA/Nuclear Lysis Buffer (containing Protease Inhibitor Cocktail) and put the sample on ice for 5 min. 4. Place the lysate into a pre-cooled microcentrifuge tube. Centrifuge at 4°C for 15 min. Collect the supernatant;
5. Remove a small volume of lysate to determine the protein concentration;
6. Combine the lysate with protein loading buffer. Boil 20 µL sample under 95-100°C for 5 min. Centrifuge for 5 min after cool down on ice.
Electrophoretic separation
1. According to the concentration of extracted protein, load appropriate amount of protein sample and marker onto SDS-PAGE gels for electrophoresis. Recommended separating gel (lower gel) concentration: 10%. Reference Table for Selecting SDS-PAGE Separation Gel Concentrations 2. Power up 80V for 30 minutes. Then the power supply is adjusted (110 V~150 V), the Marker is observed, and the electrophoresis can be stopped when the indicator band of the predyed protein Marker where the protein is located is properly separated. (Note that the current should not be too large when electrophoresis, too large current (more than 150 mA) will cause the temperature to rise, affecting the result of running glue. If high currents cannot be avoided, an ice bath can be used to cool the bath.)
Transfer membrane
1. Take out the converter, soak the clip and consumables in the pre-cooled converter;
2. Activate PVDF membrane with methanol for 1 min and rinse with transfer buffer;
3. Install it in the order of "black edge of clip - sponge - filter paper - filter paper - glue -PVDF membrane - filter paper - filter paper - sponge - white edge of clip"; 4. The protein was electrotransferred to PVDF membrane. ( 0.45 µm PVDF membrane is recommended ) Reference Table for Selecting PVDF Membrane Pore Size Specifications Recommended conditions for wet transfer: 200 mA, 120 min. ( Note that the transfer conditions can be adjusted according to the protein size. For high-molecular-weight proteins, a higher current and longer transfer time are recommended. However, ensure that the transfer tank remains at a low temperature to prevent gel melting.)
Block
1. After electrotransfer, wash the film with TBST at room temperature for 5 minutes;
2. Incubate the film in the blocking solution for 1 hour at room temperature;
3. Wash the film with TBST for 3 times, 5 minutes each time.
Antibody incubation
1. Use 5% skim milk powder to prepare the primary antibody working liquid (recommended dilution ratio for primary antibody 1:1000), gently shake and incubate with the film at 4°C overnight; 2. Wash the film with TBST 3 times, 5 minutes each time;
3. Add the secondary antibody to the blocking solution and incubate with the film gently at room temperature for 1 hour;
4. After incubation, wash the film with TBST 3 times for 5 minutes each time.
Antibody staining
1. Add the prepared ECL luminescent substrate (or select other color developing substrate according to the second antibody) and mix evenly;
2. Incubate with the film for 1 minute, remove excess substrate (keep the film moist), wrap with plastic film, and expose in the imaging system.
|
| IHC |
Experimental Protocol:
Deparaffinization/Rehydration
1. Deparaffinize/hydrate sections:
2. Incubate sections in three washes of xylene for 5 min each.
3. Incubate sections in two washes of 100% ethanol for 10 min each.
4. Incubate sections in two washes of 95% ethanol for 10 min each.
5. Wash sections two times in dH2O for 5 min each.
6.Antigen retrieval: For Citrate: Heat slides in a microwave submersed in 1X citrate unmasking solution until boiling is initiated; continue with 10 min at a sub-boiling temperature (95°-98°C). Cool slides on bench top for 30 min.
Staining
1. Wash sections in dH2O three times for 5 min each.
2. Incubate sections in 3% hydrogen peroxide for 10 min.
3. Wash sections in dH2O two times for 5 min each.
4. Wash sections in wash buffer for 5 min.
5. Block each section with 100–400 µl of blocking solution for 1 hr at room temperature.
6. Remove blocking solution and add 100–400 µl primary antibody diluent in to each section. Incubate overnight at 4°C.
7. Remove antibody solution and wash sections with wash buffer three times for 5 min each.
8. Cover section with 1–3 drops HRPas needed. Incubate in a humidified chamber for 30 min at room temperature.
9. Wash sections three times with wash buffer for 5 min each.
10. Add DAB Chromogen Concentrate to DAB Diluent and mix well before use.
11. Apply 100–400 µl DAB to each section and monitor closely. 1–10 min generally provides an acceptable staining intensity.
12. Immerse slides in dH2O.
13. If desired, counterstain sections with hematoxylin.
14. Wash sections in dH2O two times for 5 min each.
15. Dehydrate sections: Incubate sections in 95% ethanol two times for 10 sec each; Repeat in 100% ethanol, incubating sections two times for 10 sec each; Repeat in xylene, incubating sections two times for 10 sec each.
16. Mount sections with coverslips and mounting medium.
|
| IF |
Experimental Protocol:
Specimen Preparation
1. Aspirate liquid, then cover cells to a depth of 2–3 mm with 4% Paraformaldehyde diluted in 1X PBS.
NOTE: Paraformaldehyde is toxic, use only in a fume hood.
2. Fix cells for 15 min at room temperature.
3. Aspirate fixative, rinse three times in 1X PBS for 5 min each.
4. Proceed with Immunostaining.
Immunostaining
1. Add theblocking buffer and incubate for 60 min at RT.
2. Prepare primary antibody diluent in antibody dilution buffer as recommended .
3. Aspirate blocking solution, apply diluted primary antibody.
4. Incubate overnight at 4°C.
5. Rinse three times in 1X PBS for 5 min each.
6. Incubate specimens in fluorochrome-conjugated secondary antibody diluted in antibody dilution buffer for 1–2 hr at room temperature in the dark.
7. Rinse three times in 1X PBS for 5 min each.
8. Mount slides usingmounting medium with DAPI and cover with coverslips.
9. For best results, allow mountant to cure overnight at room temperature. For long-term storage, store slides flat at 23°C protected from light.
|
| IF |
Experimental Protocol:
Sample Preparation
1. Adherent Cells: Place a clean, sterile coverslip in a culture dish. Once the cells grow to near confluence as a monolayer, remove the coverslip for further use.
2. Suspension Cells: Seed the cells onto a clean, sterile slide coated with poly-L-lysine.
3. Frozen Sections: Allow the slide to thaw at room temperature. Wash it with pure water or PBS for 2 times, 3 minutes each time.
4. Paraffin Sections: Deparaffinization and rehydration. Wash the slide with pure water or PBS for 3 times, 3 minutes each time. Then perform antigen retrieval.
Fixation
1. Fix the cell coverslips/spots or tissue sections at room temperature using a fixative such as 4% paraformaldehyde (4% PFA) for 10-15 minutes.
2. Wash the sample with PBS for 3 times, 3 minutes each time.
Permeabilization
1.Add a detergent such as 0.1–0.3% Triton X-100 to the sample and incubate at room temperature for 10–20 minutes.
(Note: This step is only required for intracellular antigens. For antigens expressed on the cell membrane, this step is unnecessary.)
Wash the sample with PBS for 3 times, 3 minutes each time.
Blocking
Add blocking solution and incubate at room temperature for at least 1 hour. (Common blocking solutions include: serum from the same source as the secondary antibody, BSA, or goat serum.)
Note: Ensure the sample remains moist during and after the blocking step to prevent drying, which can lead to high background.
Immunofluorescence Staining (Day 1)
1. Remove the blocking solution and add the diluted primary antibody.
2. Incubate the sample in a humidified chamber at 4°C overnight.
Immunofluorescence Staining (Day 2)
1. Remove the primary antibody and wash with PBST for 3 times, 5 minutes each time.
2. Add the diluted fluorescent secondary antibody and incubate in the dark at 4°C for 1–2 hours.
3. Remove the secondary antibody and wash with PBST for 3 times, 5 minutes each time.
4. Add diluted DAPI and incubate at room temperature in the dark for 5–10 minutes.
5. Wash with PBST for 3 times, 5 minutes each time.
Mounting
1. Mount the sample with an anti-fade mounting medium.
2. Allow the slide to dry at room temperature overnight in the dark.
3. Store the slide in a slide storage box at 4°C, protected from light.
|
Referenzen
|
Anwendungsdaten
WB
Validiert von Selleck
-
 Lane 1: Hela, Lane 2: Hela (KO CDC25C), Lane 3: K562, Lane 4: HEK293
IF
Validiert von Selleck
-
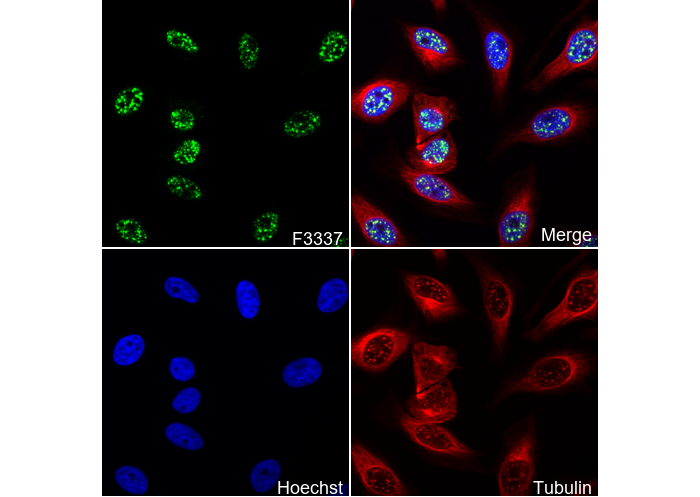 Immunofluorescent analysis of Hela cells using F3337 (green, 1:250), Hoechst (blue) and tubulin (Red).